Friday, 21 February 2020

Volume of Irregularly Shaped Prisms

In this activity students will develop the idea that the volume of a right prism of ANY shape is just the area of the base times the height. To do this they will construct their own irregularly shaped prisms from snap cubes and then use the volume that they can determine by counting the cubes to develop the relationship. There is some practice at the end that can be done via worksheet or Desmos.
  • Grade 7 -  determine, through investigation using a variety of tools and strategies (e.g., decomposing right prisms; stacking congruent layers of concrete materials to form a right prism), the relationship between the height, the area of the base, and the volume of right prisms with simple polygonal bases (e.g., parallelograms, trapezoids), and generalize to develop the formula (i.e., Volume = area of base x height).
  • Grade 8 - determine, through investigation using a variety of tools and strategies (e.g., generalizing from the volume relationship for right prisms, and verifying using the capacity of thin-walled cylindrical containers), the relationship between the area of the base and height and the volume of a cylinder, and generalize to develop the formula (i.e.,Volume = area of base x height). Note: though there isn't a direct connection to the cylinder here, since a cylinder is a prism (circular prism), it will adhere to this relationship. 
  • 2cm snap cubes (each student or pair of students will need up to 60)
  • photocopy of the grid handout for each student or pair of students. Note that when you copy or print this out, make sure that the check box "fit" is selected to maximize the size of the grid making the squares the same size as the snap cubes. You may want to verify this before printing a bunch out for the class
  • If you are doing this virtually, then you might want to have them actually build their shapes using this virtual manipulative.
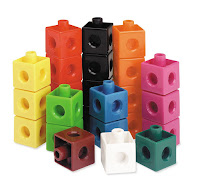
  1. Students are first given a blank grid and asked to trace two non rectangular shapes of different areas (no diagonals) using the grid lines.
  2. Once they have their shapes they should determine the area (in units2) of each shape and enter that in their table. 
  3. Students then take the cubes and connect them to create a 3D shape to match the profile of their drawn shapes (1 unit high).If you are doing this virtually, then you might want to have them actually build their shapes using this virtual manipulative.
  4. Students can then determine the volume of each shape (in units3) by counting the cubes used and enter those values in the table
  5. Next increase the height of each shape by one unit, determine the volume by counting the cubes and enter those values in the table.
  6. Repeat step 5 so that the shapes are now 3 units high. 
  7. Students are then to look for a connection between the height, area of the shape (base) and the volume and use that relationship to predict the volume of a shape that is 6 units in height (without building it). Students will hopefully see that the volume can be found by multiplying the area of the base times the height. 
  8. Generalize the relationship (Volume = area of the base x height) and have students complete this worksheet to practice. For a Desmos version, click here.   

Did you use this activity? Do you have a way to make it better? Did you find a mistake? If so tell us in the comment section. Thanks

Wednesday, 28 November 2018

Array Multiplication Cards

Even though this is a blog that dedicates most of the resources to grades 7-12, sometimes we have to have some help with the basics for those students. In Ontario we have a new initiative called Focus on the Fundamentals and even though you could argue that we haven't forgot the fundamentals, perhaps an the idea of putting a little extra attention on the fundamentals may not be a bad idea. In this case we are looking at students "knowing" their multiplication facts. Knowing is in quotations because what one person thinks of as knowing may not agree with others. For example, memorizing the multiplication tables doesn't necessarily mean that a student knows what multiplication is.

Cut to a couple of weeks ago. We was in a primary math session from @gfletchy. In that session, we used these 10 frame cards that were basically a game to help students recognize numbers. It seemed like an engaging way to do that. With a little bit of searching, we found that he also has cards for multiplication that focus on groupings and go up to 7x7. Since we thought the idea of practicing multiplication tables would be good for grade 7&8 students, we thought a more advanced representation might be as arrays. So here are cards that can be used to practice multiplication facts up to 12x12.

Right now there are two versions and two sets of each version. We have one version with just the dots and one set with the dots with rectangles around groups to highlight the arrays a bit more. Each version also has two sets, one with the answers on the back (for kids to work in pairs) and one without (for group play).

To help with the counting of the dots on each side we have put vertical and horizontal lines to mark groups of 5 dots. This way students can see, for example, there is a group of 5 and three more on one side and two groups of 5 and 2 more on the other side so this must be 8x12. The lines can also help by letting students use decomposition to break the problem up into smaller simpler problems which they can add together. This is an effective strategy to use on their way to internalizing the multiplication table. One thing you might want to do is show them one card and just ask them to Notice and Wonder about what they see and hopefully they can recognize what the lines indicate.

  • All Grades - As review 
  1. Print out the cards on card stock, cut and laminate them. You will probably want more than one set. We recommend printing each set out using a different colour of card stock. This way if the sets get mixed up then you just need to match the colours.
  2. When you print out the cards, the first 2 pages cover 2x1 all the way to 7x7 (with a few times one cards in there to fill the page). The next page cover 8x2 all the way to 9x9. And finally the last two pages go from 10x2 all the way to 12x12. So if you have kids struggling still with multiplication, you may want to limit them to some of the first few pages.
  3. If you are printing out the cards with the answers on them, the answer pages show up every second page with the intent that when you print them, you have double sided checked off on your printer/copier. If you have the option, have it "Flip on the long edge". 


  1. For Game Mode: Put kids in groups of 3-6.
  2. Shuffle the cards (versions without answers on the back)
  3. Someone flips over a card. 
  4. The first person to say the correct product gets the card (or a point). Students have to agree that that is the correct answer.  If a student says more than one answer, they are disqualified for that card. 
You might be concerned that speed of calculations may come into play here and if you play in Game Mode, you wouldn't be wrong. One way for speed to be a factor is to start out with just the easiest of cards (first two pages) and only move on when the majority of students have mastered them. Or you could have students write their answers on white boards and then not reveal the answer until everyone has completed (with not worry about points or who answered first). 
  1. Conversely, you could have kids work in pairs and use the decks with the answers on the back. 
  2. Shuffle the cards (version with the numbers on the back)
  3. Deal out half to each person. 
  4. Each student takes their deck and holds them so the other can't see either side. 
  5. They take turns showing each other a dot array and listen for their partner to say the answer (visible on the back). 
Did you use this activity? Do you have a way to make it better? Did you find a mistake? If so tell us in the comment section. Thanks

Tuesday, 19 December 2017

Visual Pattern Cards

This activity was inspired by @JoBoalar's TED talks were she talks about people using colours to show how patterns grow. It was also inspired by @FawnpNguyen's awesome VisualPatterns.org site. The premiss is simple, students are each given a card with three terms of a linear pattern on it. They are to recreate the pattern (and add two more terms) using colour to show how it grows. Then they use what they see to help come up with a general term for their pattern.

For this activity there are 32 cards made that have linear patterns in the form Ax, x + B and Ax + B. For grade 7, if your focus is developing the general term, then you should just use the cards with general terms in the form Ax & x + B (patterns that have expressions involving only one operation).


  • Gr7PA – represent linear growing patterns, using a variety of tools (e.g., concrete materials, paper and pencil, calculators, spreadsheets) and strategies (e.g., make a table of values using the term number and the term; plot the coordinates on a graph; write a pattern rule using words);
  • Gr7PA – make predictions about linear growing patterns, through investigation with concrete materials;
  • Gr7PA – develop and represent the general term of a linear growing pattern, using algebraic expressions involving one operation (e.g., the general term for the sequence 4, 5, 6, 7, … can be written algebraically as n + 3, where n represents the term number; the general term for the sequence 5, 10, 15, 20, … can be written algebraically as 5n, where n represents the term number); 
  • Gr8PA – represent, through investigation with concrete materials, the general term of a linear pattern, using one or more algebraic expressions (e.g.,“Using toothpicks, I noticed that 1 square needs 4 toothpicks, 2 connected squares need 7 toothpicks, and 3 connected squares need 10 toothpicks. I think that for n connected squares I will need 4 + 3(n – 1) toothpicks, because the number of toothpicks keeps going up by 3 and I started with 4 toothpicks. Or, if I think of starting with 1 toothpick and adding 3 toothpicks at a time, the pattern can be represented as 1 + 3n.”);
  • Gr8PA – represent linear patterns graphically (i.e., make a table of values that shows the term number and the term, and plot the coordinates on a graph), using a variety of tools (e.g., graph paper, calculators, dynamic statistical software);
  • Gr8PA – determine a term, given its term number, in a linear pattern that is represented by a graph or an algebraic equation 
  1. For this activity there are 32 possible cards to use. Print them out on card stock (and laminate them if possible). Cut out each card to create a class set. If you are doing this with grade 7s then you may want two sets of the last two pages of cards since they deal with general terms in the form Ax & x + B.
  2. Print out the Answer card so that you can circulate easily giving help or advice. 
  3. Students should have enough connecting cubes or colour tiles of various colours to create the patterns. Or students could use this virtual colour tiles app from Mathies.ca

  1. Hand out one card per student (you could also do one card per pair and have extra cards for students that finish early)
  2. Instruct students to recreate their pattern using colours (connecting cubes or colour tiles) to show how the pattern grows. You may also ask them to restrict to two colours and show it that way as well. 
  3. Once students have recreated their pattern, have them create the next two terms using the same colour distinctions. 
  4. Once you are satisfied with their five terms, have them re arrange their tiles so that they create a line of each set of tiles for each term (like a bar graph).  While groups are getting to the same place you might ask quicker groups to determine the number of tiles needed for the 15th term
  5. Next have students use their tiles to help determine the general term 
  6. You might want to take several different examples to consolidate creating the general term. 
As an alternate procedure you might consider the progression of steps seen in this video using some of these cards to more systematically develop the a method for generating the algebraic expression for a linear pattern. 


Did you use this activity? Do you have a way to make it better? If so tell us in the comment section. Thanks

Thursday, 30 November 2017

Rational Functions Continuum

We are continuing to develop a series of "Continuum" activities. In these activities, students are given basic knowledge questions on cards from an envelope. On each card there is one type of question. When the student completes a set number of questions on their card correctly, they then replace that card and grab a new card from the next envelope. This next envelop will typically have problems of a similar (to each other) type but incrementally more difficult than the previous envelope. In this way students move from simpler to more difficult questions at their own pace.

Here we have two sets of cards. On one set we have rational equations that start with simple ratio type questions and move to rational equations with polynomials. The second set are similar in style but are created from rational inequalities. In each case, as students move through the cards, the questions become more difficult.

Note that if you look at the expectations, they both say "simple" equations/inequalities but as you move to the last few cards, you may not consider those simple. That is purposeful. We create the cards so that the first one is easy enough for everyone but the last one(s) may go beyond the curriculum so that kids who are not struggling have some place to go that may be challenging. As a teacher, you should decide which card is the level that you hope all students will reach. For other rational function activities to investigate their nature, check out our other post here.

Typically when we have done these, students could check their answers by using a UV pen to reveal the answers written on the answer cards (see example from our fraction continuum to the right). This adds a bit of "magic" to this activity that the students tend to enjoy making them work just a little harder.
  • MHF4U 3.6 - solve simple rational equations in one variable algebraically, and verify solutions using technology
  • MHF4U 4.2 - determine solutions to polynomial inequalities in one variable [e.g., solve f(x) ≥ 0, where f(x) = x3 – x2 + 3x – 9] and to simple rational inequalities in one variable by graphing the corresponding functions, using graphing technology, and identifying intervals for which x satisfies the inequalities
  • Enough copies of each of the question cards for your class (there are six cards per page at each level except the last) in different colour card stock for each level, laminated (use colours that allow seeing the magic pen writing - you may want to test this). You will likely not need as many cards in the last few envelopes as students work at different paces. 
  • The answer cards are the same as the question cards but you write the answers in invisible ink on them. To help distinguish the answer cards to the question cards you should put a stamp or sticker on the back. Write on the cards first then laminate them. If you write on the card after lamination then the ink tends to wear off. There are sample answers at the end of each document. That is for you to carry around (or not) but not for showing students - more for your reference.
  • The "magic" pens can be purchased at Chapters/Indigo or we found these at a Scholastic's book fair. We have since purchased some on eBay or Amazon.

  1. Place the questions in piles (or in envelopes taped to the wall) in order of difficulty and set up three stations for the answer cards. Students will get a card and answer the first 4 questions (you might choose less or more questions to answer but typically choose a number so that if they don't get them all correct, there are enough questions left on the card for them to practice more). 
  2. You could have all students start at level 1 but for this activity to be most successful, students should start at the appropriate envelope. If they start in one that is too hard they will be frustrated and if they start in one that is too easy they will be bored. Use an exit card (the day before) to help you decide which envelope each student should start in. When giving back the exit card write down the colour card they will start in. 
  3. Students may decide to do one question at a time and then go check their answer or they may do all 4 and then check. Students are monitoring themselves so they decide. If they get the first 4 right, they have a level of mastery to move themselves to the next card. If not there are more questions on the card until they master that type. You can decide whether you want them to do the other 2 or just do enough to get a total of four correct. 
  4. As they move through the continuum, the hope is that they reach the level that you decide equates to "simple" but not too hard4. You may wish to have them do all the questions on that card. 
Note that we have been having some issues with Google Docs reformatting the cards depending on what machine or browser you are using. This seems especially true with these cards where there are so many equations. So you may have to reformat when you make your own copy. For a good version, just use the PDFs.
Did you use this activity? Do you have a way to make it better? If so tell us in the comment section. Thanks

Wednesday, 27 September 2017

Mixed Radical Card Sort

This is supposed to be a quick introduction activity to mixed radicals. Rather than just tell students what mixed radicals are and how they behave, we would start with these and have them explore first and then consolidate afterwards. There are four groups of cards where each group has a different "root" radical. Within each group there are three sets cards that are all equal in value but different in form. Students have to arrange group the cards that are equal and hopefully come up with the connection between a radical in different forms. There is a physical card version as well as a Desmos Cardsort version.
  • MCR3U - verify, through investigation with and without technology, that √ab = √a x √b, a ≥ 0, b ≥ 0, and use this relationship to simplify radicals (e.g., √24) and radical expressions obtained by adding, subtracting, and multiplying 
  • If you are using the physical version, we recommend printing each set of cards (2 pages) on a different colour of cardstock. This makes it easier to group the cards afterwards since each group will be a different colour. We also suggest laminating the cards before cutting. 
  • You may wish to print out one copy of the full two sheets back to back for yourself as an answer key.
  • If you are using the Desmos version, make a copy of the activity and create your class code for students. 
  1. Put students into groups of 3 (or four). Using larger groups will make this activity go faster but will mean that students do less.
  2. Ask students to determine all the expressions that are equal to each other. Because this is an intro activity and students don't know the properties of mixed radicals, let them use calculators. It is optional to tell them that there are a total of 12 sets of three cards that are equal. If you are pressed for time you might take some of the sets out.
  3. Once students have found all of their matches ask them to further group those sets of three in any way they wish. Hopefully they will put them into four groups with the same "root" radical.
  4. As further extensions
  5. You may wish to ask some of the questions, below, from the Desmos cardsort (there are even more there) to pull out the nature of mixed radicals.

Did you use this activity? Do you have a way to make it better? If so tell us in the comment section. Thanks

Friday, 30 June 2017

Trig Identities Continuum

We have started to develop a number of "Continuum" activities. In these activities, students are given basic knowledge questions on cards from an envelope. On each card there is one type of question. When the student completes a set number of questions on their card correctly, then they replace that card and grab a new card from the next envelope. This next envelop will typically have problems of a similar (to each other) type but incrementally more difficult than the previous envelope. In this way students move from simpler to more difficult questions at their own pace. The cards start with Quotient and Reciprocal Identities, then move to Pythagorean, then to progressively more difficult mixed identities and finally a card where they make their own.

We've created two versions. One where all the equations are identities and one where some of them are not. Typically when we have done these, students could check their answers by using a UV pen to reveal the answers written on the answer cards (see example from our fraction continuum to the right). Because these are identities we chose to have the two sets so if you use set one, students just verify that they are identities. However, if you use set two, students will have to figure out which ones are and which are not identities. So on this second set you could have cards that have the invisible ink that verify which are the identities.


  • MCR3U - 1.5 prove simple trigonometric identities, using the Pythagorean identity sin2(x) + cos2(x) = 1; the quotient identity tan(x) = sin(x)/cos(x); and the reciprocal identities sec(x) = 1/cos(x), csc(x) = 1/sin(x) , and cot(x) = 1/tan(x)
  • MHF4U - As review

  • Enough copies of each of the question cards for your class (there are six cards per page at each level) in different colour card stock for each level, laminated (use colours that allow seeing the magic pen writing - you may want to test this). You will likely not need as many cards in the last few envelopes as students work at different paces. 
  • If you are using the set with the non-identities then you should have 3 sets of the answer cards (use magic pen to write the answers anywhere along each equation - the answers are on the last page of the Google Doc). The answer cards are the same as the question cards but you write the answers in invisible ink on them. To help distinguish the answer cards to the question cards you should put a stamp or sticker on the back. Write on the cards first then laminate them. If you write on the card after lamination then the ink tends to wear off. There are sample solutions at the end of each document. That is for you to carry around (or not) but not for showing students but more for your reference.
  • 3 "magic" pens can be purchased at Chapters/Indigo or we found these at a Scholastic's book fair. We have since purchased some on eBay or Amazon.


  1. Place the questions in piles (or in envelopes taped to the wall) in order of difficulty and set up three stations for the answer cards (if you are using the ones with non-identities). Students will get a card and answer the first 4 questions. 
  2. Normally we might have students start at different places but because of the fact that there are different identities on each card, students should start at the first envelope.  
  3. If they are using the set with non-identities, to check their answers, they will go to a station and use the magic pens. Students may decide to do one question at a time and then go check their answer or they may do all 4 and then check. Students are monitoring themselves so they decide. If they get the first 4 right, they have a level of mastery to move themselves to the next card. If not there are more questions on the card until they master that type. You can decide whether you want them to do the other 4 or just do enough to get a total of four correct. 
  4. As they move through the continuum, the hope is that they reach level 4 which matches the grade 11 curriculum. You may wish to have them do all the questions on that card. 
  5. The fifth level is set up to challenge students who are moving forward quickly. Here they create their own question.

Note that we have been having some issues with Google Docs reformatting the cards depending on what machine or browser you are using. So you may have to reformat when you make your own copy. For a good version, just use the PDFs.
Did you use this activity? Do you have a way to make it better? If so tell us in the comment section. Thanks