Showing posts with label continuum. Show all posts

Thursday, 30 November 2017

Rational Functions Continuum

We are continuing to develop a series of "Continuum" activities. In these activities, students are given basic knowledge questions on cards from an envelope. On each card there is one type of question. When the student completes a set number of questions on their card correctly, they then replace that card and grab a new card from the next envelope. This next envelop will typically have problems of a similar (to each other) type but incrementally more difficult than the previous envelope. In this way students move from simpler to more difficult questions at their own pace.

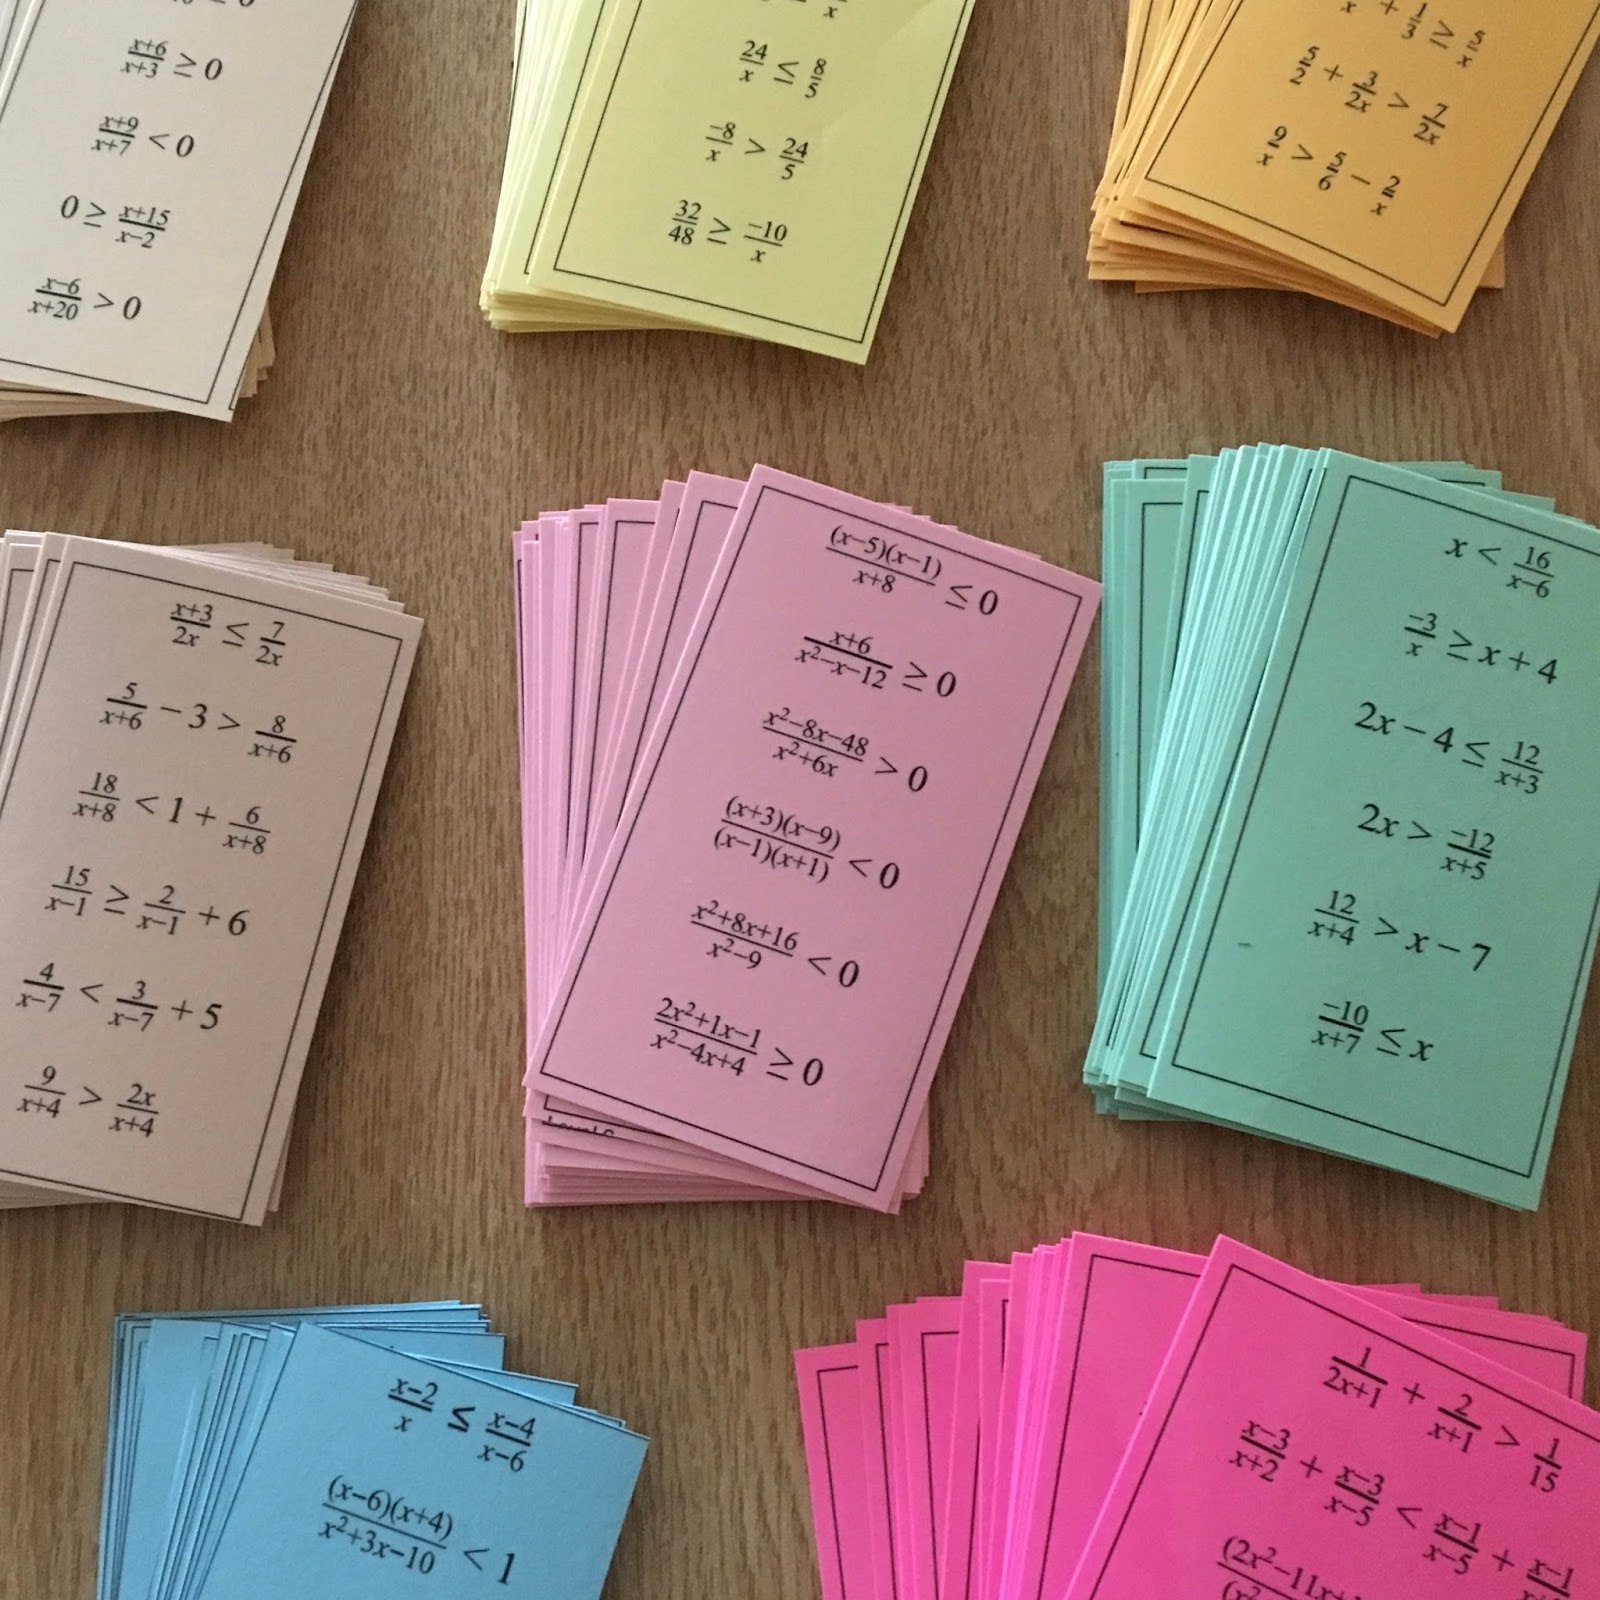
Here we have two sets of cards. On one set we have rational equations that start with simple ratio type questions and move to rational equations with polynomials. The second set are similar in style but are created from rational inequalities. In each case, as students move through the cards, the questions become more difficult.

Note that if you look at the expectations, they both say "simple" equations/inequalities but as you move to the last few cards, you may not consider those simple. That is purposeful. We create the cards so that the first one is easy enough for everyone but the last one(s) may go beyond the curriculum so that kids who are not struggling have some place to go that may be challenging. As a teacher, you should decide which card is the level that you hope all students will reach. For other rational function activities to investigate their nature, check out our other post here.

Typically when we have done these, students could check their answers by using a UV pen to reveal the answers written on the answer cards (see example from our fraction continuum to the right). This adds a bit of "magic" to this activity that the students tend to enjoy making them work just a little harder.
  • MHF4U 3.6 - solve simple rational equations in one variable algebraically, and verify solutions using technology
  • MHF4U 4.2 - determine solutions to polynomial inequalities in one variable [e.g., solve f(x) ≥ 0, where f(x) = x3 – x2 + 3x – 9] and to simple rational inequalities in one variable by graphing the corresponding functions, using graphing technology, and identifying intervals for which x satisfies the inequalities
  • Enough copies of each of the question cards for your class (there are six cards per page at each level except the last) in different colour card stock for each level, laminated (use colours that allow seeing the magic pen writing - you may want to test this). You will likely not need as many cards in the last few envelopes as students work at different paces. 
  • The answer cards are the same as the question cards but you write the answers in invisible ink on them. To help distinguish the answer cards to the question cards you should put a stamp or sticker on the back. Write on the cards first then laminate them. If you write on the card after lamination then the ink tends to wear off. There are sample answers at the end of each document. That is for you to carry around (or not) but not for showing students - more for your reference.
  • The "magic" pens can be purchased at Chapters/Indigo or we found these at a Scholastic's book fair. We have since purchased some on eBay or Amazon.

  1. Place the questions in piles (or in envelopes taped to the wall) in order of difficulty and set up three stations for the answer cards. Students will get a card and answer the first 4 questions (you might choose less or more questions to answer but typically choose a number so that if they don't get them all correct, there are enough questions left on the card for them to practice more). 
  2. You could have all students start at level 1 but for this activity to be most successful, students should start at the appropriate envelope. If they start in one that is too hard they will be frustrated and if they start in one that is too easy they will be bored. Use an exit card (the day before) to help you decide which envelope each student should start in. When giving back the exit card write down the colour card they will start in. 
  3. Students may decide to do one question at a time and then go check their answer or they may do all 4 and then check. Students are monitoring themselves so they decide. If they get the first 4 right, they have a level of mastery to move themselves to the next card. If not there are more questions on the card until they master that type. You can decide whether you want them to do the other 2 or just do enough to get a total of four correct. 
  4. As they move through the continuum, the hope is that they reach the level that you decide equates to "simple" but not too hard4. You may wish to have them do all the questions on that card. 
Note that we have been having some issues with Google Docs reformatting the cards depending on what machine or browser you are using. This seems especially true with these cards where there are so many equations. So you may have to reformat when you make your own copy. For a good version, just use the PDFs.
Did you use this activity? Do you have a way to make it better? If so tell us in the comment section. Thanks

Friday, 30 June 2017

Trig Identities Continuum

We have started to develop a number of "Continuum" activities. In these activities, students are given basic knowledge questions on cards from an envelope. On each card there is one type of question. When the student completes a set number of questions on their card correctly, then they replace that card and grab a new card from the next envelope. This next envelop will typically have problems of a similar (to each other) type but incrementally more difficult than the previous envelope. In this way students move from simpler to more difficult questions at their own pace. The cards start with Quotient and Reciprocal Identities, then move to Pythagorean, then to progressively more difficult mixed identities and finally a card where they make their own.

We've created two versions. One where all the equations are identities and one where some of them are not. Typically when we have done these, students could check their answers by using a UV pen to reveal the answers written on the answer cards (see example from our fraction continuum to the right). Because these are identities we chose to have the two sets so if you use set one, students just verify that they are identities. However, if you use set two, students will have to figure out which ones are and which are not identities. So on this second set you could have cards that have the invisible ink that verify which are the identities.


  • MCR3U - 1.5 prove simple trigonometric identities, using the Pythagorean identity sin2(x) + cos2(x) = 1; the quotient identity tan(x) = sin(x)/cos(x); and the reciprocal identities sec(x) = 1/cos(x), csc(x) = 1/sin(x) , and cot(x) = 1/tan(x)
  • MHF4U - As review

  • Enough copies of each of the question cards for your class (there are six cards per page at each level) in different colour card stock for each level, laminated (use colours that allow seeing the magic pen writing - you may want to test this). You will likely not need as many cards in the last few envelopes as students work at different paces. 
  • If you are using the set with the non-identities then you should have 3 sets of the answer cards (use magic pen to write the answers anywhere along each equation - the answers are on the last page of the Google Doc). The answer cards are the same as the question cards but you write the answers in invisible ink on them. To help distinguish the answer cards to the question cards you should put a stamp or sticker on the back. Write on the cards first then laminate them. If you write on the card after lamination then the ink tends to wear off. There are sample solutions at the end of each document. That is for you to carry around (or not) but not for showing students but more for your reference.
  • 3 "magic" pens can be purchased at Chapters/Indigo or we found these at a Scholastic's book fair. We have since purchased some on eBay or Amazon.


  1. Place the questions in piles (or in envelopes taped to the wall) in order of difficulty and set up three stations for the answer cards (if you are using the ones with non-identities). Students will get a card and answer the first 4 questions. 
  2. Normally we might have students start at different places but because of the fact that there are different identities on each card, students should start at the first envelope.  
  3. If they are using the set with non-identities, to check their answers, they will go to a station and use the magic pens. Students may decide to do one question at a time and then go check their answer or they may do all 4 and then check. Students are monitoring themselves so they decide. If they get the first 4 right, they have a level of mastery to move themselves to the next card. If not there are more questions on the card until they master that type. You can decide whether you want them to do the other 4 or just do enough to get a total of four correct. 
  4. As they move through the continuum, the hope is that they reach level 4 which matches the grade 11 curriculum. You may wish to have them do all the questions on that card. 
  5. The fifth level is set up to challenge students who are moving forward quickly. Here they create their own question.

Note that we have been having some issues with Google Docs reformatting the cards depending on what machine or browser you are using. So you may have to reformat when you make your own copy. For a good version, just use the PDFs.
Did you use this activity? Do you have a way to make it better? If so tell us in the comment section. Thanks

Thursday, 20 April 2017

Fraction Operation Continuum

As math teachers we definitely want our students to practice to become proficient but piles of problems or worksheets aren't going to be very engaging to students. We think this tweak to the standard worksheet is a way to turn those boring questions into something more engaging.

In Ontario, grade 7s are introduced to operations with fractions. Addition & subtraction and multiplication & division with whole numbers. The premiss here is fairly simple. Students are presented with multiple cards of questions (in this case of adding and subtraction of fractions (with a little of division and multiplication with whole numbers). The cards represent problems that increase in difficulty as you go from one to the next. Students can all start at the first envelope or you could give them an exit card the day before to help place them in a particular card to start. Students check their own answers using answer cards with the answers written with "invisible" ink that can be revealed by shining a UV light on it.

Students really seem to like this style of activity as they feel empowered to move from card to card when they are ready and the added feature of checking the answers with the UV pen gives a sense of novelty. This could be used as practice or review.

  • Gr7 - divide whole numbers by simple fractions
  • Gr7 - use a variety of mental strategies to solve problems involving the addition and subtraction of fractions
  • Gr7 - add and subtract fractions with simple like and unlike denominators, using a variety of tools (e.g., fraction circles, Cuisenaire rods, drawings, calculators) and algorithms;
  • Gr7 -  demonstrate, using concrete materials, the relationship between the repeated addition of fractions and the multiplication of that fraction by a whole number
  • Gr8 - As review (we plan an extension so that this could be used for grade 8 with multiplying and dividing fractions)
  • Enough copies of each of the question cards for your class (there are four cards per page at each level) in different colour card stock for each level,  laminated (use colours that allow seeing the magic pen writing - you may want to test this). You will likely not need as many cards in the last few envelopes as students work at different paces. You will need as many as you have in your class if you decide to start everyone at the first level. Fewer if you let students start at different levels (see below)
  • 3 sets of the answer cards (use magic pen to write the answers anywhere along each equation, they could be sideways, upside-down, (the answers are on the last page of the Google Doc). The answer cards are the same as the question cards but you write the answers in invisible ink on them. To help distinguish the answer cards to the question cards you should put a stamp or sticker on the back. Write on the cards first then laminate them. If you write on the card after lamination then the ink tends to wear off. There is a separate answer card on the last page of the download. That is for you to carry around (or not) but not for showing students but more for your reference.
  • 3 "magic" pens can be purchased at Chapters/Indigo or we found these at a Scholastic's book fair. We have since purchased some on eBay or Amazon.

  1. Place the questions in piles (or in envelopes taped to the wall) in order of difficulty and set up three stations for the answer cards. Students will get a card and answer the first 5 questions. 
  2. You could have all students start at level 1 but for this activity to be most successful, students should start at the appropriate envelope. If they start in one that is too hard they will be frustrated and if they start in one that is too easy they will be bored. Use an exit card (the day before) to help you decide which envelope each student should start in. When given back the exit card write down the level they will start in. 
  3. To check their answers, they will go to a station and use the magic pens. Students may decide to do one question at a time and then go check their answer or they may do all 5 and then check. Students are monitoring themselves so they decide. If they get the first 5 right, they have a level of mastery to move themselves to the next card. If not there are more questions on the card until they master that type. You can decide whether you want them to do the other 5 or just do enough to get a total of five correct. 
  4. As they move through the continuum, the hope is that they reach level 6 which matches the grade 7 curriculum. Since our goal is to get them to level 6, students should solve ALL equations on that card instead of just five. 
  5. The seventh level is set up to challenge students who are moving forward quickly. They should solve all questions on this card.  


  • Fraction Operation Continuum (with Answers) - (PDF, Google Doc)
Did you use this activity? Do you have a way to make it better? If so tell us in the comment section. Thanks

Monday, 4 April 2016

Rate of Change Continuum

A continuum is something where the level difficulty increases in incremental steps. In this case the continuum is dealing with calculating the rate of change (slope) of a linear relationship.
We have previously posted a continuum for solving equations here and here but this one is a bit different. This one has five levels of determining the rate of change from a graph (in context) for a linear relationship. The first level shows lattice points, a rate triangle and the calculation of both rise and run (super basic) and the difficulty increases with each level (see below) until the last level where there is only a scale with no grid lines (so the answer is more of an estimate).

Each page has 6 graphs and students (once they choose the level to start with) choose to answer any three. If they do so correctly then they can move to the next level. The To make things a bit more fun, rather than check the answers with you, we suggest using a UV pen and ink written on the question cards for students to check.
This activity is probably best meant as a consolidation. Note that the expectation is about investigating so hopefully students will have had a chance to develop their own strategies for determining the rate of change. This activity just helps to scaffold it a bit in case they are having trouble (Eg a common mistake that students make when determining the rate of change when the line is in context is to just count boxes for the rise and run without considering the scale).
Note that we also have an Explain Everything version if you have students who have iPads (you may even want to try out the new Explain Everything Collaborative Whiteboard app to have students work in groups from different devices).

  • MPM1D, MFM1P - determine, through investigation, connections among the representations of a constant rate of change of a linear relation.
  • 20 copies of each of the question cards in different colour cardstock for each level,  laminated (use colours that allow seeing the magic pen writing). Note that you may not need 20 copies of each. Perhaps fewer of the first couple levels and last level as most kids will probably be starting in the 2nd or 3rd level
  • 3 sets of the answer cards (use magic pen to write the answers anywhere along each equation, they could be sideways, upside-down, (the answers are on the last page of the Google Doc). To help distinguish the answer cards to the question cards you should put a stamp or sticker on the back.
  • 3 "magic" pens can be purchased at Chapters/Indigo or we found these at a Scholastic's book fair. We have since purchased some on eBay.

  1. For this activity to be successful, students must start at the appropriate envelope. If they start in one that is too hard they will be frustrated and if they start in one that is too easy they will be bored. Use an exit card (the day before) to help you decide which envelope each student should start in. When given back the exit card write down the level they will start in. 
  2. Place the questions in piles in order of difficulty and set up three stations for the answer cards. Students will get a card and answer any 3 questions. 
  3. To check their answers, they will go to a station and use the magic pens. Students may decide to do one question at a time and then go check their answer or they may do all 3 and then check. Students are monitoring themselves so they decide. If they get the first 3 right, they have a level of mastery to move themselves to the next level. If not there are more questions on the card until they master that type. 
  4. As they move through the continuum, the hope is that they reach level 4 which matches the grade 9 curriculum. Since our goal is to get them to level 4, students should solve ALL equations on that card instead of just three. 
  5. The fifth level is set up to challenge students who are moving forward quickly. They should solve all questions on this card. They require some estimation and so answers that students get should be approximate. 
Note that for the Explain Everything version, there are still 6 possible graphs for each level but only two on each page. And to check the answer, slide the black ellipse to either the bottom left or right corner. 
Did you use this activity? Do you have a way to make it better? If so tell us in the comment section. Thanks